Build Your Own Custom Mechanical Keyboard from Scratch

This guide covers the exact components, assembly steps, and technical requirements needed to build a custom mechanical keyboard from the ground up. You will learn how to select a PCB, choose the right switches for your specific typing style, and avoid the common pitfalls that lead to "scratchy" or unresponsive keystrokes. We're skipping the fluff to focus on the hardware-level decisions that actually affect your typing experience.
What Parts Do I Need to Build a Mechanical Keyboard?
To build a custom keyboard, you need a PCB, a case, a plate, switches, keycaps, and a stabilizer kit. Think of it like building a PC—if you miss one small part, the whole thing is just a very expensive paperweight. Most beginners make the mistake of buying parts that aren't compatible with each other (don't let that be you).
Here is the breakdown of the core components:
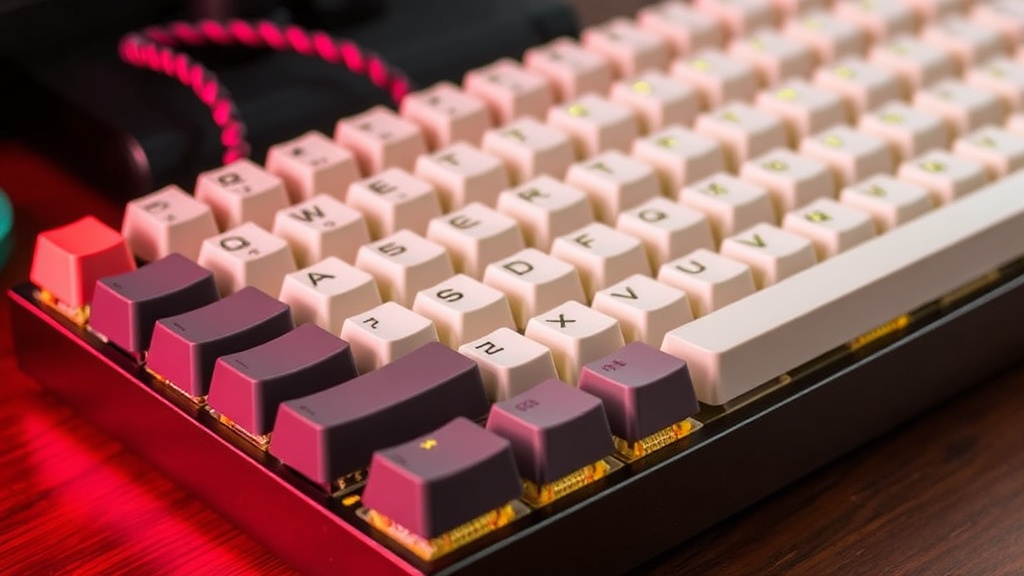
- PCB (Printed Circuit Board): The brain of the keyboard. It dictates the layout (ANSI vs. ISO) and whether you need to solder or can use hot-swap sockets.
- Case: The housing. You can find these in aluminum, polycarbonate, or even wood. Aluminum feels premium, but plastic is often better for dampening sound.
- Switches: These are the actual mechanisms under the keys. You'll choose between linear (smooth), tactile (a bump), or clicky (loud and annoying).
- Plate: This sits above the PCB and holds the switches in place. Materials like FR4 or Brass significantly change the stiffness of the board.
- Stabilizers: These prevent larger keys (like the Spacebar or Shift) from wobbling.
- Keycaps: The part your fingers actually touch. Look for PBT plastic rather than ABS if you want them to last without getting "shiny" from finger oils.
If you're coming from a standard membrane keyboard, the difference in tactile response is massive. It's not just a luxury—it's a tool. A well-built board can actually reduce typing fatigue over a long workday.
How Much Does a Custom Keyboard Cost?
A custom mechanical keyboard typically costs between $150 and $400, depending on whether you choose enthusiast-grade parts or budget-friendly components.Gateron.
I've put together a rough cost-comparison table so you can see where your money actually goes. Don't expect a "budget" build to feel like a $500 custom board, but you can get close with smart choices.
| Component Tier | Budget Build (USD) | Mid-Range (USD) | High-End/Enthusiast (USD) |
|---|---|---|---|
| PCB & Case | $50 - $80 | $100 - $180 | $250+ |
| Switches (per set) | $15 - $25 | $30 - $50 | $70+ |
| Keycaps | $20 - $40 | $50 - $90 | $150+ |
| Total Estimated | ~$100 - $150 | ~$200 - $350 | ~$500+ |
One thing to watch out for: the "hidden" costs. If you choose a non-hot-swap PCB, you'll need to buy a soldering iron and solder. If you want a better typing feel, you might also want to buy lube (like Krytox 205g0) and specialized tools for tuning your switches. It adds up.
Which Type of Switch Should I Choose?
The right switch depends entirely on your environment and your personal preference for tactile feedback. If you work in an open office, a loud "clicky" switch is a great way to make enemies. If you're a gamer, you might want something incredibly fast and smooth.
Here is a quick guide to the three main categories:
- Linear Switches: These have a smooth, consistent stroke from top to bottom. They are favored by many gamers because there is no resistance to fight against during rapid key presses. Brands like Cherry have set the standard for these for decades.
- Tactile Switches: These feature a noticeable "bump" when the key is actuated. This is great for typists who want confirmation that a keypress actually happened without the loud noise of a click.
- Clicky Switches: These provide both a tactile bump and an audible "click" sound. They are highly polarizing—people either love the feedback or absolutely loathe the noise.
Pro tip: Always buy one or two sample packs of switches before committing to a full set of 70 or 100. Reading a spec sheet is one thing, but feeling the spring weight in person is another. You can't return a "feeling" once you've opened the package.
How Do I Assemble the Keyboard?
Assembly follows a specific order: prepare the stabilizers, install them onto the PCB, mount the plate and switches, and finally snap on the keycaps. If you skip the stabilizer step, you'll have to take the whole board apart later to fix a rattling spacebar.
Follow these steps for a standard build:
- Test the PCB: Before you put anything together, plug the PCB into your computer and use a "key tester" website. Use tweezers to short the contact points for each key to ensure every single one actually works. This saves you from a massive headache later.
- Lube the Stabilizers: This is the most tedious part, but it's where the "premium" feel comes from. Apply a small amount of grease to the metal wires to eliminate that annoying rattling sound.
- Install Stabilizers: Snap or screw the lubed stabilizers into the PCB.
- Mount the Plate and Switches: Lay the plate over the PCB. Insert your switches through the plate into the PCB. If you have a hot-swap board, you just press them in. If you're soldering, you'll need to solder the pins now.
- Case Assembly: Place the completed PCB/Plate assembly into your case and secure it with the provided screws.
- Add Keycaps: This is the most satisfying part. Just press them onto the stems of the switches.
If you're doing a hot-swap build, be careful. If you push a switch in at an angle, you can bend the metal pins. If a key doesn't work after installation, don't panic. Usually, it's just a bent pin that needs to be straightened with a pair of tweezers.
The learning curve is steeper than it looks, but the result is a tool that is actually tailored to you. You aren't just buying a peripheral; you're building a custom interface. Just don't expect it to be perfect on the first try—perfection in mechanical keyboards is a moving target.